# Listings
An overview of all your listings is displayed under the menu item Listings.
You can choose whether a listing is to be displayed in the list view or detail view. By default, all listings are first displayed as a list view.
# List View
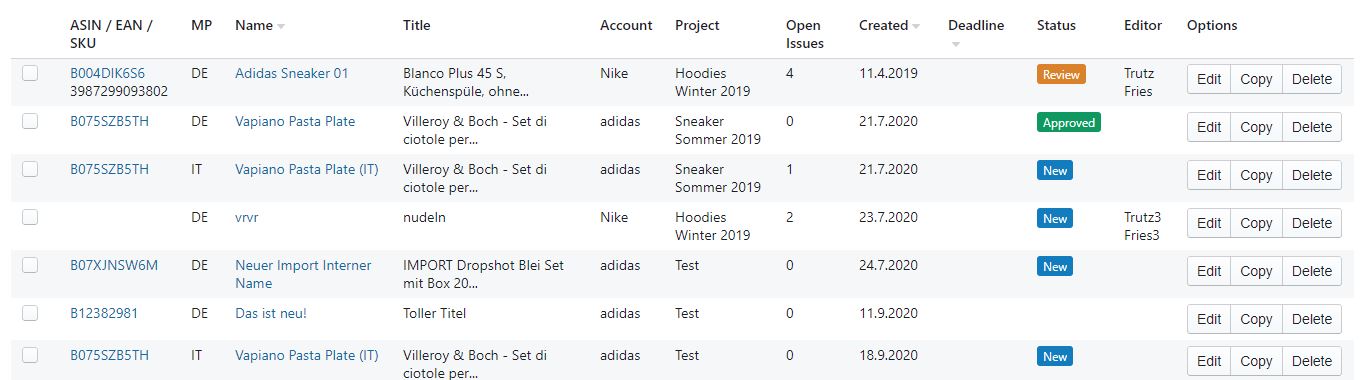
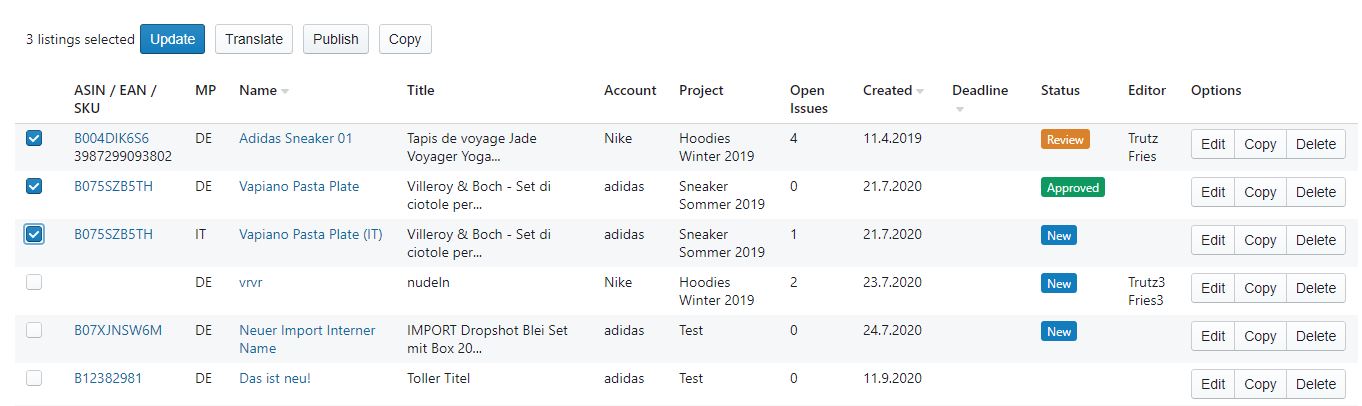
The List View shows you ASIN, EAN, SKU, Marketplace, Name, Title, Account, Open Issues, Creation Date, Deadline, Status, Editor and specific options per listing.
# Detail view
By clicking on Detail all listings are displayed in detail. Name, Internal Name, Status, User, Market, ASIN, EAN, SKU as well as Title, Bulletpoints, Search Terms, Custom Fields and Description with the respective bytes are displayed. This way, listings can be proofread quickly and efficiently.

By clicking on Edit, a listing can also be edited without having to open it in the Listing Editor.

By clicking Open in Listing Editor a listing can be opened in the listing editor. There, the briefing, the keyword research and the listing can be revised. You can also restore older versions of the listing under the Previous Versions tab or publish the listing on Amazon under the Publishing tab.
# Status
A status can be selected for all existing listings, which can be updated manually depending on the progress of the project. This way, all project participants are always aware of the current status of the listing. This is particularly efficient when more than one person is working on a listing.
The status New describes that the listing is new and unprocessed. The optimiser knows that he still needs to work on this listing.
The status In Progress describes that the optimiser is still in the process of creating the listing.
The status Review describes that the listing has been completed by the optimiser and is now waiting to be proofread.
The status Rework describes that the listing has been proofread and issues and suggestions for improvement have been left. The optimiser knows that he must now revise the listing.
The status Approved describes that the listing has been accepted after the final proofreading and is ready for publication.
The status Published describes that the listing has been published. (This status is independent of whether the listing has been published via the Publish function in Seller Central).
The status Cancelled describes that the creation of the listing has been cancelled and that the optimiser no longer needs to pay attention to this listing.
The Status field can be set individually. For example, it can be changed as often as desired from Review to Rework.
By clicking on Create new Listing you can create a new listing.

# Options per listing
You have 3 options for each listing.
- edit: You can edit your listing.
- copy: You can copy a listing, e.g. to create a translation or a listing for a similar product.
- delete: You can delete the listing entirely.
# Edit listing
By clicking on Edit you can edit the briefing, the keyword research and the listing. You can also restore older versions of the listing under the Previous Versions tab or publish the listing on Amazon under the Publishing tab.
Note
To publish the listing on Amazon you have to enter your MWS data under 'Accounts'. See MWS data.
# Copy listings
By clicking on Copy you can create a copy of the listing. For the copy you can select name, ASIN, EAN, SKU, marketplace and a language. If you do not select a language for the copy, the listing will be copied in the original language.

# Delete Listing
Click on Delete to delete the listing.
# Create a new listing
To create a single new listing, proceed as follows:
- click on Create Listing.
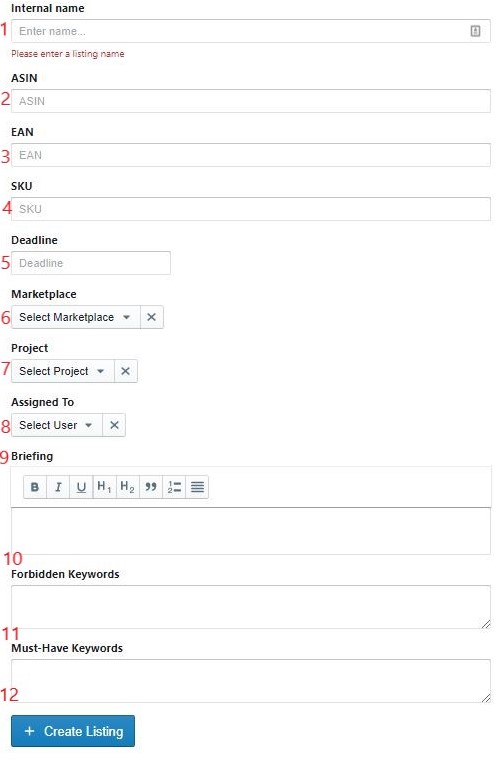
- Choose an internal name for your listing. Define a unique name for your listing so that it is clear which product it is.
- Enter the ASIN of the product (if known).
- Enter the EAN of the product (if known).
- Enter the SKU of the product (if known). This is required if you want to transfer the data to Amazon as a seller.
- Select a deadline from the calendar by which the listing should be completed.
- Select the marketplace (language) of the listing to be created.
- Assign the listing to a project.
- Designate a person responsible for the listing.
- Here you can specify a briefing for the optimisation (for example, notes on target group, competitors, etc.). Later, you can upload attachments such as photos or PDFs under Briefing in the listing.
- Enter specific keywords or phrases that should not appear in the listing.
- Enter keywords that should always appear in the listing.
- Click on Create Listing to create the listing for optimisation.
All specifications can be changed at any time.
# Import Listings
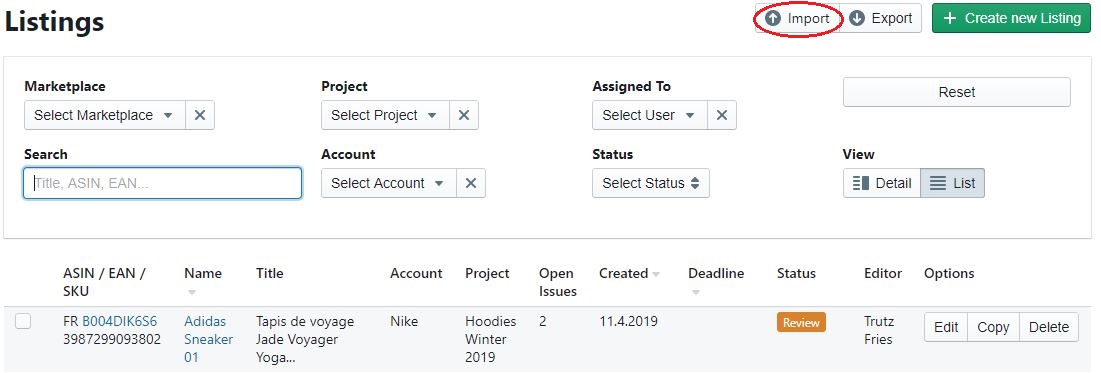
If you have a lot of listings that need to be optimised, you can easily use a template to import them under Listings via the Import button. Download the sample file, insert the listing data accordingly and import the file. The listings are created directly in AXOLIST.
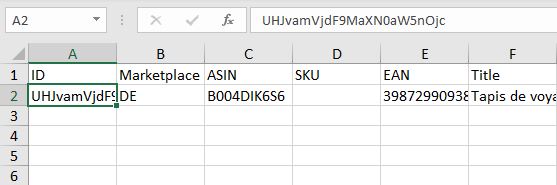
The following columns are currently available in AXOLIST format:
- ID
- Marketplace
- ASIN
- SKU
- EAN
- Title
- Bullet1
- bullet2
- bullet3
- Bullet4
- Bullet5
- Bullet6
- Bullet7
- Bullet8
- Bullet9
- bullet10
- Description
- SearchTerms
- CustomField1
- CustomField2
- CustomField3
- CustomField4
- CustomField5
- InternalName
- Status
- Deadline
- Briefing
- ForbiddenKeywords
- MustHaveKeywords
There are two ways to use this function. Firstly, you can create a completely new listing in an Excel spreadsheet and import it into AXOLIST. Secondly, you can update an existing listing outside AXOLIST. First export your listing and then open it as an Excel table to make changes. You can then import it back into AXOLIST. This way you have the possibility to update several listings at once. To do this, export all the listings in which you want to make changes and open them as an Excel table. Now you can edit entire columns or rows.
When importing after an Axolist export (see Exporting a Listing), note the column ID (a set of digits with which AXOLIST identifies a particular listing). This is important when you want to update listings. This ID is exported automatically. If you open the listing again, this ID must not be changed, otherwise AXOLIST will not be able to recognise the listing when you import it. If the ID is changed or left blank, AXOLIST will create a new listing instead of updating the existing listing.
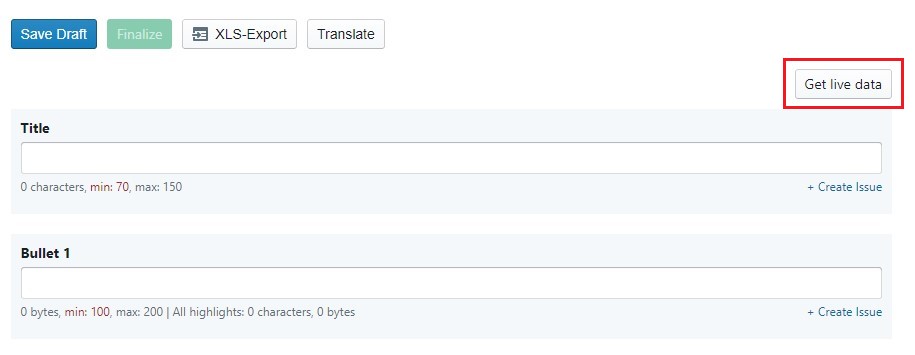
# Get live data
By clicking on the Get live data button you are able to download the current live version of the listing.
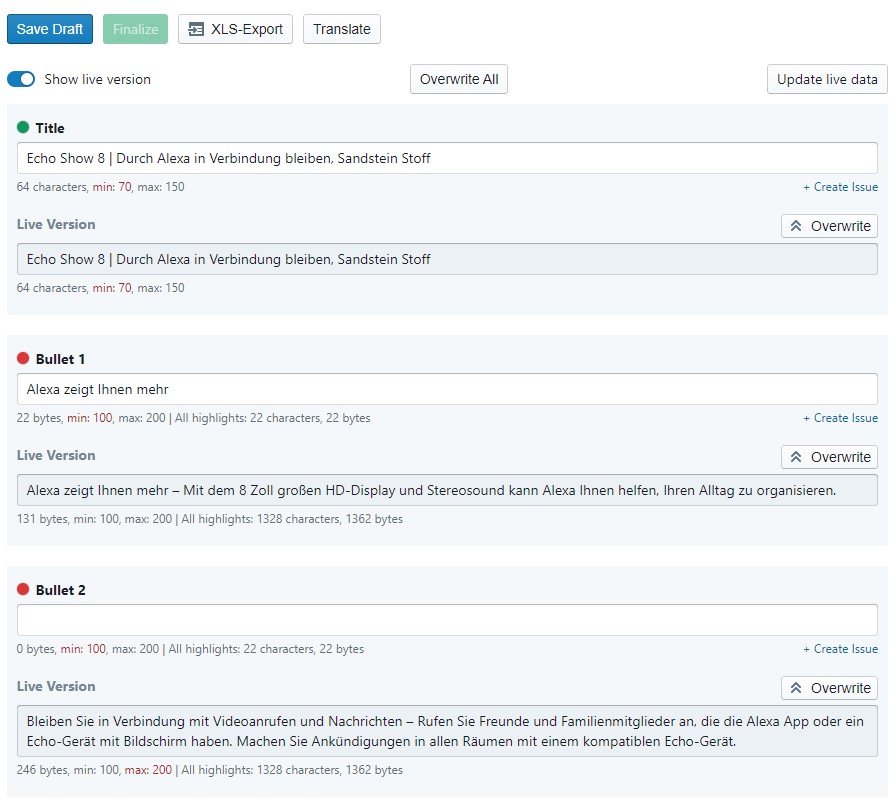
By clicking on Show live version the current listing texts will appear under the text fields to be edited. You have the option of switching this function on or off, as you wish. A red or green dot will appear above each text field. A red dot means that there are differences between the live version and the new version and a green dot means that the live version and the new version are identical. The differences can be viewed by clicking on the dot. You also have the option to take over the live version by clicking Overwrite or Overwrite All. This simplifies the editing of an existing listing.
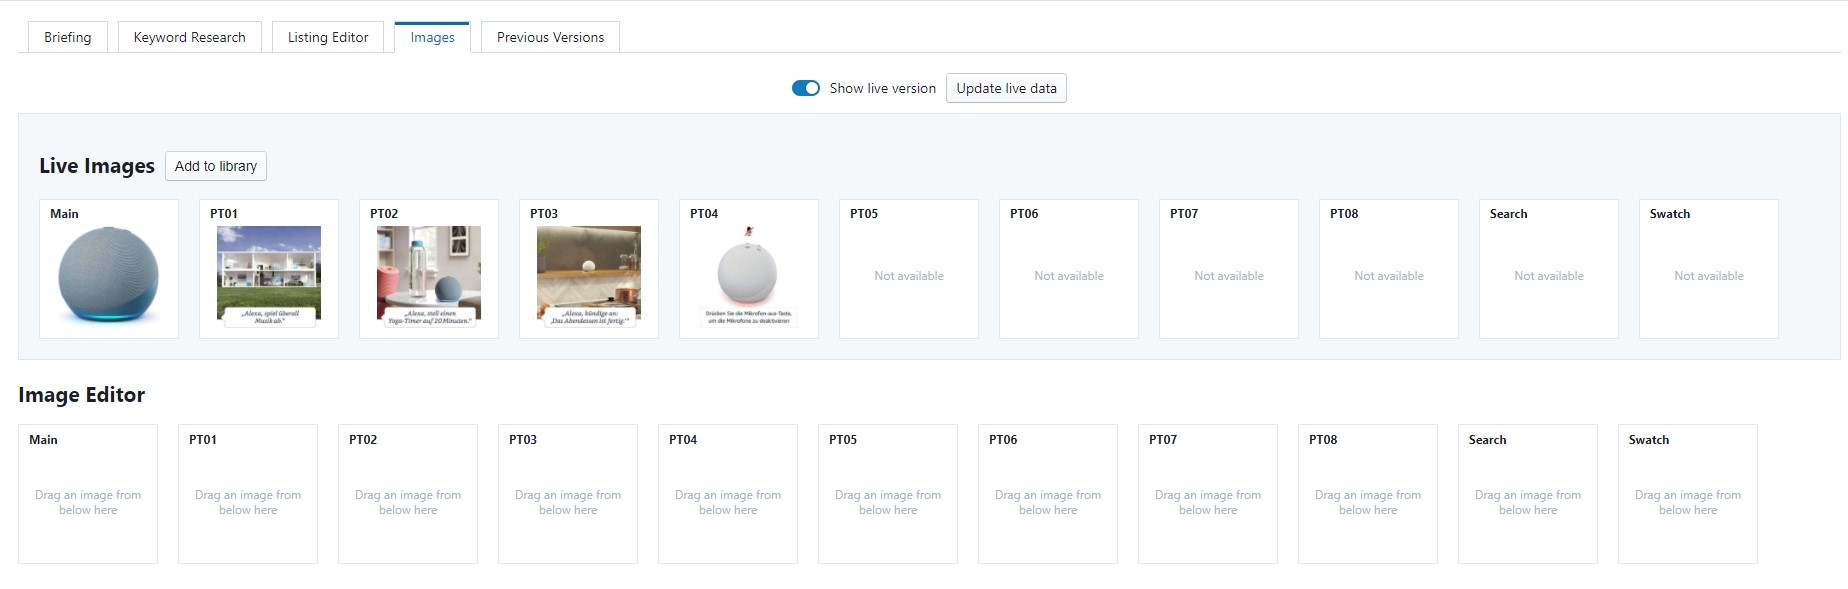
In addition, you can download the current images and they will be displayed next to the listing editor in the Images tab.
Have Listings optimised
If you need additional resources for optimisation, please contact us. We have a team of trained optimisers, including native speakers in many different languages.
For more information, please visit: https://axolist.com/amazon-content-optimierung/ (opens new window)
Feel free to contact us if you have any questions: hello@axolist.com
# Export Listings
With a click on XLS-Export you can export all listings that belong to the respective project. All the filter functions you have previously set will be taken into account.
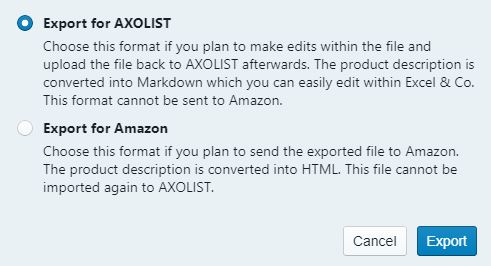
If you want to export a listing, it can be exported as a file for Amazon or as a file for AXOLIST. If you export the file for Amazon, the file is prepared in such a way that you can easily enter it into an Amazon stock file. The export contains all content fields.
If you export the file for AXOLIST, the file can be edited in an Excel spreadsheet and then imported back into AXOLIST. With this export, a listing ID is taken into account, which AXOLIST needs during the later import in order to recognise the listing (See Import listings).
# Bulk functions
In the Listings section, you have the possibility to select as many listings as you like by clicking on the small box on the left. Then 4 possible bulk functions will open, which you can apply to the listings you have selected.
- Update: Update the assigned user, the deadline or the status of your listings.
- Translate: Select a language for the selected listings to be translated into.
- Publish: Publish the listings on Amazon.
- Copy: Create a copy of the selected listings.
# Update
With the Update function, you can assign a new user, set a new deadline and status for the listings you have selected.

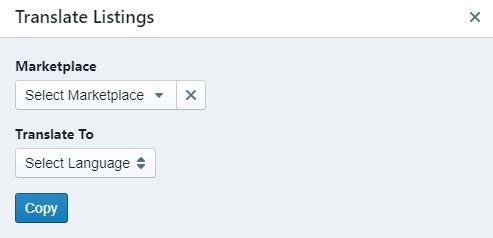
# Translate
With the function Translate you can set a new language for the listings you have selected and translate them into this language.
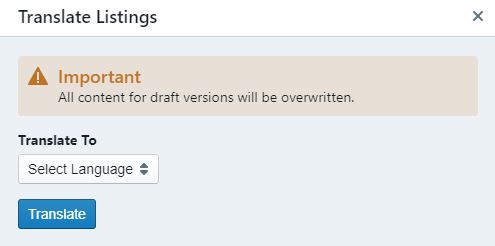
Caution!
If you translate the selected listings, they will be overwritten!
# Publish
With the function Publish you can publish your selected listings on Amazon. Here you can choose wether to publish only your written listing-text, images or both.
Note
In order to use this function, you must enter your MWS data under Accounts. More information here.
# Copy
With the Copy function you can copy the listings you have selected. For the copy, you can select a marketplace and a language into which the listing will be translated. If you do not select a language for the copy, the listing will be copied in the original language.